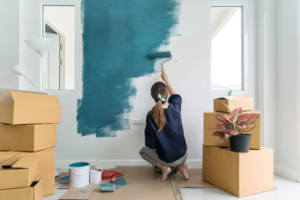
How to Get the Best Home Painting Estimates
House Painters Wilmington DE can breathe new life into a home’s interior and exterior. It can also make it more appealing to potential buyers.
Before you begin painting, it is important to take precautions. These include moving furniture and covering floors to protect them from paint drips and splatter.
Choosing the right color is one of the most important aspects of a home painting project. The wrong shade can make a room feel small, dark, or just plain off. Fortunately, there are plenty of tools and tips that can help you find the perfect color to suit your space.
Choosing the perfect paint color depends on several factors, including your personal preferences and the colors in surrounding rooms and furnishings. If you’re worried about making a mistake, take your time to select a shade and see how it looks in different lighting throughout the day. Some shades may appear different in the morning than they do at night, and you’ll also want to test the paint color near carpets and furniture.
A good place to start is by perusing design/decorating magazines or books for inspiration. You can also look at the colors in your wardrobe for a sense of what you’re drawn to and which shades might go with certain decor styles. Once you’ve narrowed down the options, consider coordinating the color palette with a rug, bedding, window treatments or other furniture pieces.
When choosing a paint color, it’s best to choose a shade that’s on trend but still fits your style and preferences. For example, you might like a dramatic green but are worried about it looking too bold in your home. In this case, you can tone it down by using a lighter shade on the trim and ceiling or by pairing it with neutral hues such as beige and gray.
If you have a hard time imagining how a specific paint color will look in your home, ask the paint specialist to mix a sample for you. This will give you a more precise, accurate representation of the color than a small strip of a paint chip. And always remember to use the highest-quality paint you can afford, as this will yield a more livable finish.
If you’re planning to sell your home in the future, it’s a good idea to opt for a neutral shade such as beige, white or gray. These colors are easy on the eyes and will appeal to most potential buyers. But if you’re determined to make your house stand out, don’t be afraid to try something more unique. Deep crimson or emerald green can be a great way to add some flair without putting off a potential buyer.
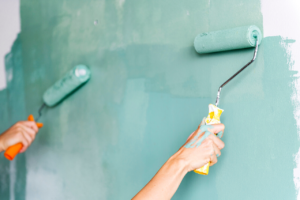
A fresh coat of paint can completely transform the look and feel of a room. It’s a quick and easy way to make your home look more attractive, as well as add value to it. However, the quality of the finished product can depend on how well you prepare the surface before you begin painting. If you skip this step, you may end up with a messy, uneven, or unsatisfactory job.
The first step in interior home painting is to remove furniture, rugs, curtains, and other decor from the area you’re going to be working on. This makes it easier for your painters to get to the surfaces that need attention, and will also help prevent them from getting paint on anything else. If something can’t be moved out of the room, consider putting it in a corner or covering it with plastic and tape.
Next, you’ll want to clean the walls and ceiling. This can be as simple as wiping down the surface with a damp cloth or sponge, or more involved like washing it down with a mild detergent and water. This will ensure that the new paint adheres to the surface and doesn’t peel away later on.
Before you start painting, it’s a good idea to create a working checklist of all the steps you need to take. This will serve as a handy guide while you’re working on the project, and it will also help you keep track of any repairs or replacements that might be necessary.
Once you’re ready to paint, it’s a good idea to protect nearby surfaces with painters’ tape and drop cloths. You should also remove light fixtures and cover electrical outlets and switches with plastic. If you have a lot of furniture to move around, it may be worth hiring a moving company or asking for help from a friend.
One last thing to remember is that you’ll need to decide whether to use oil-based or latex paint. Latex is generally preferred for interior paint because it dries quickly and doesn’t require the use of turpentine or other harsh solvents for clean up. But oil-based paints can still be a good choice for doors and trim, as they hold up better against moisture and grease.
When getting estimates for a painting project, it’s important to compare the scope of work, price, and other details. It’s also a good idea to get multiple estimates. This will help you find the contractor that is right for your job. Generally, it’s recommended that you get three estimates. This number strikes a balance between getting enough information and not overwhelming yourself with too many options.
Make sure that all the estimates are clearly itemized and include the costs of everything from labor to paint. If you notice a significant difference in price between estimates, ask yourself why the differences exist. For example, you might find that one contractor uses a square foot estimate while the other doesn’t. This can lead to large price differences that are not justified by the amount of work being performed.
Labor costs can vary based on a variety of factors, such as the size and complexity of the home and the type of paint used. Other factors that can increase labor costs include hard-to-access areas, extensive preparation and cleanup, and the need for additional coats of paint. It’s also important to consider the cost of materials and equipment. This can include brushes, rollers, ladders, paint sprayers, and other equipment. It’s often more affordable to rent these items rather than buy them, particularly when they will only be used for a short period of time.
You should also make sure that the estimates you receive include the total costs of the project including labor, material, overhead, and profit margin. This is important to understand so that you can set your pricing appropriately and meet your profit goals. You can use a free estimator to calculate your markup and help you reach your financial goals.
Providing a detailed and thorough estimate is the first step to winning a job. It’s also an opportunity to show your professionalism and build trust. A well-written and professional estimate will allow you to win more jobs and build a stronger business.
With a simple estimating app, like Joist, you can create and deliver accurate painting estimates in minutes. Using a mobile estimating app puts more billable hours back in your week, and improves the quality of your estimates.
Painting is a big job that can make or break your home’s look. Many homeowners choose to hire a professional to do the work for them. However, hiring a painter is not always a cheap option. There are a lot of factors to consider including labor, materials and preparation costs. To get a better idea of the total cost of your project, it is important to compare quotes from multiple painters. It is also a good idea to discuss your specific needs and preferences with the painter so that they can provide you with a more accurate estimate.
When you are comparing quotes, remember that there are two types of costs: direct and indirect. Direct costs are things like paint and labor while indirect costs are other expenses, such as gas and tools. It is also helpful to ask each painter to provide you with a breakdown of their estimated cost for the entire project, including any potential hidden costs or additional charges that may arise during the course of the work.
One of the best ways to find a reputable and experienced painter is to ask for references from past clients. You can also try looking for photos of previous painting projects online or in local business directories. You can also visit your local paint or hardware store to get recommendations from other customers. Many painters will have a website where they feature pictures of their work and testimonials from satisfied customers.
You should also ask the painter about their experience and expertise in handling your type of painting project. For example, if you have vaulted ceilings or trim with intricate designs, you will want to find a painter who has experience in these areas. They will have the tools and know-how to properly cover or remove these details without causing damage or exposing them to the elements.
Finally, it is a good idea to ask the painter about their insurance coverage and any guarantees they offer. In addition to offering a guarantee on their work, most painters will be happy to answer any questions you may have about their services. They realize that their job is a big investment and want to give you peace of mind that they will do a quality job.
Bedroom Painting Ideas
Before you even pick up your first paintbrush, it’s important to have a plan of attack. Painters Bunbury will help you avoid mistakes and ensure a flawless finish.
Vincent Van Gogh cherished this painting so much that he painted it twice more on smaller canvasses. A third, a reduction of the original Bedroom, is in the collection .
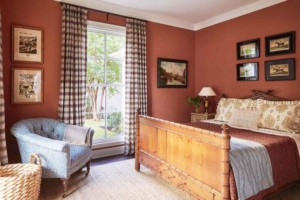
Color can make your bedroom a place you long to go to at the end of the day or a space that you keep unfolded laundry and takeout boxes (we’ve all been there). The right paint color can give you a relaxing sanctuary, while also reflecting your style and boosting mood.
The best bedroom painting colors are subtle tones that work well with your furniture and bedding. Light colors open up a room and create an airy, spacious feel. Darker colors can add a cozy, intimate feeling to your space. Neutral shades are a great option because they can be easily changed with new accessories without the need to repaint.
If you want to add more color to your bedroom, consider using a color washing technique. This involves applying multiple glazes over a base coat in your chosen color. Then, use a dry brush to blend and soften the colors together. For the best results, be sure to prep the surface of your walls before starting – remove all stains and patches.
A light sage green wall works with many different design styles, from vintage to contemporary. The color pairs nicely with warm wood furniture and neutral-colored accents like throw pillows and wall hangings. You can even use a green wash on ceilings, as the design duo at did here. This gives the room a sense of height and helps draw the eye up.
Choosing the perfect paint color for your bedroom may seem challenging, but a little bit of planning can help. Start by looking at your furniture, bedding, and accessories for inspiration. Then, choose a color that complements those hues. Finally, remember that a dark shade can make your small bedroom feel boxed in, while a lighter shade can give it a more expansive feel.
When you’re ready to get started, don’t forget to pick a sample of your desired color and test it in the room before making any commitments. The lighting in a home is very different from that of a store, so it’s important to see how the color looks in your own space.
Diamonds add depth and dimension to a wall, drawing the eye up and creating visual intrigue. Depending on your color choice, they can make a room feel larger or cozier. They can also be used as a stenciled wallpaper design to create a feature wall or to cover an entire space.
Although diamonds are often thought of as being a bit too childish to be used in a grown-up space, they actually look quite sophisticated when done correctly and can add a dramatic and theatrical effect to an accent wall or even a whole room. This decorative painting technique is not for the faint of heart and does require a lot of taping, but it’s an excellent way to give a bedroom or foyer an incredible wow factor.
Start by applying a base coat of the lighter color you plan to use for the diamonds and allow it to dry completely. Then mark with a pencil or chalk which areas will remain in the base coat colour and which will be filled in with the contrasting paint. If you choose to use chalk, rub it off once the tape is up and before you paint so that there is no visible chalk line in your finished product.
Next, find the width of the diamond pattern you want and divide it by two to determine how high the diamonds will be. This will give you the height of each ‘box’ in your diamond design. You can always move the box higher or lower if you decide to alter the size of your diamonds, but it’s best to start with a height that will fit well on your wall and work from there.
Once you have the height of each ‘box’ marked on your wall, begin taping the outline of the diamonds to be painted with your tape. Try to place the tape firmly and score the outer edge of the tape with your fingernail or plastic trowel to minimize the risk of paint bleeding under the edges of the tape.
After the diamonds are taped off, fill them in with your contrasting paint and allow it to dry completely before carefully removing the tape. If you want a smooth finish, lightly sand any areas where the diamonds meet and apply another coat of your base colour to those sections.
When painting a bedroom, texture can provide an interesting and unique touch to the room. This can be done in many ways, but one of the easiest is by using a texture paint. There are several types of texture paints available, and it is important to choose the right type for your needs. For example, a sandstone texture will give your walls the appearance of being painted with sand, while a smooth texture will allow you to create a swirl effect with a roller.
Another way to add texture to your bedroom wall is by using a stencil. This is a great option for those who do not have much time to spend on a project. The stencil can be used to create a pattern or design on the wall, and then the rest of the room can be painted with a simple brush.
In addition to adding texture, a stencil can also be used for color blocking. This is a simple way to change up a room without having to move any furniture or replace any light fixtures or other accessories. It is best to choose a neutral or muted color for this, as bright and vibrant colors can be too energizing for a bedroom.
Ragging and stippling are two other easy techniques that can be used to create a textured look on the walls. Both of these methods involve applying a glaze to the wall, which is then rolled or brushed on in various patterns. This can be done with a single color, or it can be done with a blend of colors to create a wash effect.
Metallic wall texture designs for bedrooms are a new trend that can be both dramatic and elegant. They can be used on a focal wall to create a stunning statement, or they can be used on the trim to add a hint of contrast.
Depending on the type of finish that you choose, the cost of your bedroom painting can vary. Flat paints are typically less expensive, while high-gloss finishes can be quite costly. Most homeowners choose satin or eggshell sheen latex paints for bedrooms, as these are durable and easy to clean.
Colour drenching is a popular bedroom painting idea but don’t be afraid to go a step further and introduce pattern into your room. From stripes that elongate a space to playful dots that add a touch of fun, patterned walls can create a focal point and add interest.
Try incorporating different shapes into your patterned wall design to really bring out its uniqueness and personality. Here, pastel triangles evoke a sense of celebration and excitement, perfect for a children’s bedroom.
Geometric patterns are another popular and versatile option for a statement accent wall. These can be painted in a wide variety of shades and sizes, and can make an impact whether used as a feature wall or simply to tie a room together. Using a simple color scheme to build up the shape can also look great and make it easier to coordinate with furnishings and accessories.
If you’re a little more daring and want to create a feature wall that really packs a punch, paint it a bold block shade. This can be a great way to enliven a bare room, or to delineate a working area such as a home office or dressing room. Here, a bold swathe of olive green demarcates a workspace without making the whole attic room feel too dark.
A smart trick for bedrooms with high ceilings is to paint the bottom of a wall in a darker shade and then continue this onto the ceiling, so the eye doesn’t know where the wall ends and the ceiling begins. This creates a cocooning effect for the bedroom but keeps the ceiling light and bright. A thin picture frame molding here enriches the look and helps to bind the two hues together.
Alternatively, you can use a bold block of color to create an accent wall that works in conjunction with your existing headboard. This is a particularly effective technique for bedrooms with white walls, as it can instantly energize and brighten a space. Carefully mark out a square with masking tape and then paint the middle with your chosen hue to create a dimensional wall feature.
7 Steps to Preparing Your Walls for Interior Painting
NWA Painter gives a room a fresh new look and can make a home feel brighter. It also helps protect the walls from damage and prevent mold or mildew from forming.
It’s important to prepare properly for interior painting for good results. A clean surface will give you the best chance of a satisfying paint job.
A fresh coat of interior paint brings a room back to life. It can brighten a home, create a more modern look, and make it more attractive to prospective buyers. Interior painting is a big undertaking, though, and requires proper wall preparation to ensure the best results. This seven-step guide will help you prepare your walls for a new coat of paint and get the most out of your investment.
First, clear the area. This means removing furniture from the room or at least covering it with tarps, taking down any artwork or draperies, and moving or covering light fixtures, outlets, and windows. This will minimize the chances that your belongings will be tarnished or damaged by falling or dripping paint.
You should also wash the walls before painting. This will remove dirt, grit, mold, watermarks, and dust from the surface. It will also ensure that the new coating of paint will adhere properly to the walls. After washing, you should dry the surface thoroughly.
Finally, you should patch any holes or cracks in the walls before starting to paint. This will prevent them from becoming noticeable once the paint has dried.
If you’re unsure how to do this, consult a professional. A licensed and insured painter will be able to provide advice and expertise and can complete the work efficiently and safely. They may also be able to offer you low-VOC paints, which are less likely to release harmful chemicals into the air. You should avoid using old paint in your home, as it can contain lead and other contaminants. In addition, it can be difficult to clean and remove from the surfaces.
There are entire aisles devoted to primer paints and sealers at home-improvement stores, so it’s easy to feel overwhelmed by the choices. Choosing the right one for your specific job saves time, money and frustration, and helps you achieve the results you want.
Identifying the surface type and any problem areas can help you determine the need for a specific primer. Some common situations where primer comes into play include changing from a dark shade to a lighter color or covering significant stains or damage.
Stain-blocking primers stop bleed-through of such stain-producing agents as dirt, ink, crayon marks, smoke residue, grease and mildew. You can find these in latex and oil-based formulations, with oil-based products being better at blocking water stains (see “Shellac: The Original Primer” for more details).
Bonding primers help paint adhere to surfaces that are slick or glossy, such as factory coated metal sidings, ceramic tile and glazed block walls. These are typically sanded before painting and should be washed down with a detergent or tri-sodium phosphate to remove any greasy residue.
Oil-based bonding primers are a good choice for bare wood substrates, as they penetrate the surface and help seal the porous material to prevent stains from seeping through the paint. They sand well, and are compatible with both latex and oil-based top coats. However, they release harmful volatile organic compounds (VOCs) and require mineral spirits for cleanup and drying.
VOC-free latex primers offer a low level of toxic chemicals, and they are a good fit for most home projects. However, they don’t sand as easily as oil-based products and may not cover some darker paint colors as well. Many manufacturers offer mildewcide, a compound added to the product that prevents mold and mildew from growing under the primer or the top coat.
The walls phase of interior painting may seem like a simple task, but getting the wall prepped correctly is a major component to how well the finished paint job turns out. If you skip this step, your walls may look patchy and sloppy once the paint dries.
First, sweep the walls to remove any dust or cobwebs, then vacuum baseboards and window sills and wipe them down with a damp cloth to remove any dirt and grease spots that could interfere with a smooth finish. Then, sand the surface of each wall that you plan to paint. It’s important to sand each section of the wall until it is even with the rest of the surface and smooth enough to allow the paint to bond with the wall.
Once you’ve sanded the walls, clean them again to remove any dust that may have settled and prevent your new coat of paint from adhering properly. Also, determine if you’re working with latex or oil-based paint by rubbing a small area of the wall with denatured alcohol. If the paint loses its sheen and comes off, it’s likely latex; if it sticks to the wall, you have oil-based paint.
Once you have the paint and tools you need, start on the bottom of the wall, working from the inside out. Begin by dipping your roller into the paint and wiping off any excess. Then, roll the paint onto the walls using a “W” pattern, overlapping each stroke about three inches. When you get near the trim or tape line, switch to a one- or two-inch brush and cut in along the edges, around windows and doors, etc.
Painting ceilings is an important part of any room. It adds a fresh finish to the overall room design and can create a sense of height in smaller rooms. It is also an opportunity to try something new, like a bold color or pattern that might not work on the walls.
One of the most common options for paint on ceilings is white, which can make the space feel unified. However, you can get more creative with the color on your ceiling by making it darker or lighter than the walls. Darker shades can make your room look cozy and inviting, while lighter hues can make a larger room feel more open and airy.
You can also contrast the ceiling with the walls to highlight different architectural features. For example, if you have exposed wood beams on your ceiling, a bright hue can really make them pop. Similarly, tray ceilings can be painted with a light hue to make the lower part of the ceiling seem higher and more open.
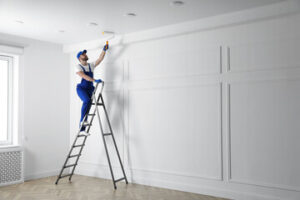
When you are ready to paint the ceiling, use the same brush you used for the trim or taped edges of the wall. Begin with what is known as “cutting in,” which means to run the brush along the trim or ceiling line, leaving about 4 inches of space between the paint and the wall. This prevents any accidental bleed onto the wall.
Because the ceiling is so high, it can be difficult and time-consuming to paint. This is often best left to professional residential painting contractors. They have the tools and experience to get the job done quickly and efficiently, while minimizing disruption to your home life.
The trim phase of interior painting is when we finish the edges of the room with a crisp, clean paint line. This includes the molding around windows, doors and the baseboards. It also includes the corners and trim around built-ins.
Paint adds beauty to our living spaces, but it does a lot more than that. It keeps moisture out and prevents mildew and mold from growing on the walls. It also repels dirt and keeps our rooms bright.
Different paints are formulated for different purposes. For example, interior paint is made to be scrubbed and resists staining, while exterior paint is designed to fight fading and moisture. Interior paint also releases fewer volatile organic compounds than exterior paint. VOCs are harmful to human health and can cause breathing problems. Using low or no VOC water-based paints can reduce these risks and help to improve indoor air quality.
It is important to use the right kind of paint for your project. Using the wrong type of paint can cause it to peel or crack over time. It can also affect how light reflects off the wall and can change the color of your room. If you are unsure which paint to choose, try purchasing small swatches of paint at the hardware store and experimenting with them in your home.
When properly done, interior painting can add value to your home and make it more appealing to potential buyers. It is one of the best investments you can make for your home and is particularly important if you are thinking of selling it in the future. Freshly painted homes often sell faster and for a higher price than those that are outdated.
Interior Painters Are Responsible For More Than Just Spraying Paint on Walls
Interior Painters Naperville IL are responsible for much more than spraying and rolling paint on walls. They also take care of other tasks, like repairing surfaces and keeping detailed records.
Trends come and go, but a fresh coat of color can refresh your home and make it feel new again. It’s inexpensive to give your house a new look without buying new furniture or other fixtures.
Painting interiors is a very common home improvement project. It adds to your house’s beauty and helps create a desired atmosphere. It also protects walls and other surfaces from damage. In addition, it can increase the resale value of your house. The best part is that it can be done on a budget. However, it is important to choose the right paint and technique for the job. There are various types of paints available in the market and they differ in terms of quality, durability, texture, etc. It is recommended to hire a professional painting contractor to get the best results.
One of the first steps a pro will take before beginning an interior painting job is to perform a visual inspection of the space. This will include examining the square footage of each room and assessing any necessary repairs or preparation work. This includes addressing any issues such as water spots or stains, or fixing cracks. Professionals will then determine how many coats of paint will be needed. It is generally good practice to have two coats for proper coverage and protection.
Before the actual painting begins, a good professional will clean up the wall surface to ensure the best results. This can include removing dust and dirt, washing the walls, and cleaning any mold or mildew. It is also a good idea to remove any furniture that can be moved and cover anything that cannot be moved with plastic sheeting or cardboard. This will reduce labor costs and the chance of getting paint on your furniture.
A skilled and experienced interior painter will use high-quality paint and tools to deliver a professional result. They will be able to help you select the right color for your space and will provide assistance regarding how the colors will match with the existing furniture. They will also make sure the paint they use is low in VOCs (Volatile Organic Compounds) which can be harmful to indoor air quality. This will be especially important if you plan to sell your home in the future, as newer paints are healthier for indoor environments and are more environmentally friendly.
Wallpapering
Whether you just moved into a new home or you’re remodeling a drab room, redoing your walls is a great way to change up the look of your space. You can make a huge difference with just a few fresh coats of paint. But deciding between painting and wallpapering is often a matter of personal preference and budget.
Wallpaper is typically more expensive than paint and requires a higher level of skill to hang. But it can create a bold or dramatic effect, and it can hide imperfections in the wall better than paint can.
Before you put up wallpaper, it’s important to thoroughly clean the walls and prepare them for the process. Wipe down the surface with a damp cloth and make sure there are no loose bits that could come off during the installation. You should also test the walls for moisture, as wallpaper is more susceptible to damage from humidity and can be prone to peeling.
There are a number of different types of wallpaper to choose from, including non-woven and vinyl. Some are painted, others have printed patterns, and some are even textured, such as grasscloth. Regardless of the type of wallpaper, professional painters recommend that homeowners always consult a designer to ensure that their choice will work well with the space.
Once a wallpaper has been applied, it can be difficult to remove. It’s important to make sure the wall is dry before applying a sealer or poly coat to the wall, and it should never be applied over an existing wallpaper that’s already on the wall. If you are going to apply a sealer or poly coat, it’s recommended that the wall be primed first.
Paint is a more versatile option for walls than wallpaper. You can mix colors and shades to find the perfect match for your space, or you can work with professionals to follow a design plan. It’s a little less permanent than wallpaper, though, and it can be easy to repaint in just a few years. It’s also a good idea to prep the walls for painting, which includes priming and sealing.
Repairing Damaged Walls
A fresh coat of paint can do wonders for a home’s interior, but walls are subject to a lot of wear and tear from the elements. Scratches, dents, cracks and more can detract from the overall look of a room, but these imperfections are easily repaired. In fact, professional painters often repair damaged sections of drywall and plaster while they prep for painting as part of their standard services.
Stains are another common issue with wall surfaces that a new coat of paint can fix. While some stains can be removed by scrubbing, others are more stubborn and may require the use of stain-blocking primer. If the stain has been caused by mold, a fresh coat of paint is a great way to cover up the mark and prevent future health issues.
Cracks in walls aren’t just unsightly, but they can also lead to compromised structure and even compromise the integrity of a home’s foundation. If the cracks aren’t addressed, moisture can creep into porous interior walls, causing damage that can cost thousands of dollars to fix. Professional painters can repair these cracks quickly and effectively so that your walls are protected.
Depending on the severity of the cracks, professional painters will employ different techniques to repair them. For smaller cracks, a plaster or putty can be used to fill the crack and smooth it out. This type of repair is much quicker than repairing a large hole or crack in drywall that requires the use of furring strips and joint tape.
A good painting contractor will realize that you’re trusting them to work on one of the most expensive and visible areas in your home, and they should be more than willing to answer any questions or concerns you may have. This includes ensuring they have the appropriate insurance to do the job safely and professionally. They should also be able to give you an accurate quote of how long the project will take and what their typical price range is for a job like yours.
Finishing Touches
Painting is a quick and easy way to refresh your home’s interior and can be a great investment in its value. Whether you’re trying to sell your home or just want to make it feel more comfortable, professional painting contractors can help.
When choosing a painter, it’s important to find one who has the right experience and qualifications. Ideally, they will have completed courses at an accredited trade school and obtained a Journeyman certificate or Red Seal certification as painters. They should also be fully insured and licensed in your area. If you’re not sure where to start, ask friends and neighbors for recommendations or use a website like Angie’s List or Yelp to review local professionals and read reviews from other homeowners.
Decorative painters specialize in providing unique, customized finishes to walls and furniture. They are trained in faux finishing, mural and custom painting, and can even add accents to existing pieces or create an entirely new look. They are also skilled at drywall repair and patching, as well as wallpaper installation.
Before starting a project, they will assess the condition of the wall and determine what procedures should be followed. They may clean the surface and then apply a sealer to protect it from moisture. They will then use a brush or roller to apply the first coat of paint.
They may then sand and prime the surface before applying a second coat. They will continue this process until the wall is smooth and ready to be finished with a third coat. The painter will then apply molding and caulking as necessary.
While it may seem like a simple job, there are actually many steps involved in the painting process. Depending on the type of wall being painted, there are different methods and techniques that must be used to ensure a quality finish. An experienced interior painter will know the right tools and materials to use, and how to properly prep the surface before painting.
Another important skill that a painter needs is knowing how to operate a ladder. They need to be able to stand on tall ladders for long periods of time without becoming too tired or losing their balance. They will also be able to assess their own level of fatigue and won’t try to push themselves beyond their limits.
Home Improvement In Today’s World. The Best Tips Available!
You don’t have to spend a lot of time or money to do some home improvement. Add wall art, get a new carpet or towels as an easy way to freshen up your home. Read on for some great ideas to liven up the look of your home.
If you are purchasing a home, hire an inspector. This can help you get a much more accurate sense of what type of fixing up may be needed. Besides, the seller will not be able to contest anything the inspector finds, and you will probably find out about things you had not noticed before.
Always make sure to cover your furniture and floors when painting. Doing so can prevent paint from staining floors or carpets. Old newspapers placed in layers can work well and are cheap. Plastic sheets and paint cloths may be used as well.
A great home improvement tip is to check out Youtube whenever you encounter a problem that’s needs fixing. There are thousands of helpful videos on Youtube that will show you how to fix problems at home. This can be a great way to keep cash in your pocket.
Carefully examine the benefits of rental equipment before securing it for a home improvement project. Any repair or renovation job can be made faster and easier by renting purpose-built equipment. Such equipment is not always economical, though. Before laying out money for rentals the canny homeowner will weigh the savings in time and effort the equipment offers against the expense the equipment adds to a home improvement project.
Whether you’re looking to complete a major home renovation or just a minor change to your decor, there are lots of ways to get the job done without breaking the bank. Put your creativity to work, and come up with a gorgeous look that reflects your inner spirit. Remember the tips in this article if you’d like to do some renovating at home.
You can also visit our other websites and post your article.
Aries Heating and Air, Winkler Electricians, Wyatt Health, Jerry Buck Plumbing and Heating, Diamond Fences Taining, Appliance Sun, Bonanza Heating, The Masters Plumbing Heating Cooling, Universe Landscape Design, Bonsai Landscaping And Tree Service, Roswell Lawn Service. Today Lawn Care, Rods Pressure Washing, Azteca Cabinets, Lawn Mowing And Landscaping Specialists, Ajax Airconditioning Littleton, Fischer Airconditioning, Blancos Handyman And Hauling Service, Roemer’s Handyman, Victor Fencing, Tree Born Mosaic Flooring, New Orleans Gutter Cleaning Crew, Vanshandy Manservices, Zanes Painters, Jackson Home Appliance, Minneapolis Appliance Repair, Lifetime Roofing And Renovations, MG Remodeling OK, Bottomline Home Repairs, Tucson Drain Cleaning Repair, Homes In Carolina Forest, JC Lawn Care Inc, Hardwood Floor Refinishing Westchester, Edgars Land Scaping and Lawn Care, Tree Service, Houston Public Radio, Twizted Tree Service, Hyperion Construction In CIA, Arrowhead Construction Company, Bill Jones Construction, Dacs Construction, Dacs Construction, WernerCo, Mighty Mop Winnipeg, AIO Landscaping, LV Inkenbrandt LLC, Anthony Family Lawn Care, All Fencing Bunbury, Wall Stone Masonry, Ever Green Custom Cabinetry, Corpus Christi Cabinet
Painting Tips And Tricks
Painting is one of the quickest and most affordable home improvements. Learn the tips and tricks that professional painters use to get the best results every time.
Before you begin, cover furniture items, TVs and other electronics with drop cloths to prevent rogue paint drips. Clean the walls with a degreaser to prepare them for paint, as grease can inhibit adhesion.
Stippling
Stippling is a painting technique where small hand-drawn dots are used to create an image. This technique allows artists to portray the subtleties of a subject with a delicate, soft look. It is also a great way to add texture to an image. To get the most out of this painting method, it’s important to use a high-quality pen with a fine tip. A Micron or Copic pen is ideal for this purpose. It is also helpful to practice on scrap paper before attempting a larger piece of artwork.
The main reason people like to stipple is the attractiveness of the final result. The thousands of precise dots that form an image give it a delicate texture, often resembling grains of sand or speckled stone. This texture is especially appealing in depicting weathering and decay, as well as the skin of a person or animal. Another benefit of stippling is that it is more forgiving than other shading techniques, as mistakes are easy to hide and can be corrected without damaging the overall image.
There are some drawbacks to this technique, however. First, stippling is time-consuming. It can take several hours to complete even a small portion of an artwork. This can be frustrating for some people, who prefer fast sketching or loose painting. In addition, stippling requires a lot of patience and precision. A single mistake can destroy a smooth tonal gradient, so beginners should start with simple subjects and work their way up to more complex images.
There are some other variations of this technique, such as dashing and hatching. Dashing is a conversion or adaptation of dotting, where the artist flicks their wrist to create small dashes of paint. This is not usually used on paintings, but can be helpful for adding details to natural objects, such as rocks or glass. Hatching is a variation of dotting that involves creating a grid of lines. This is not usually used in paintings, but can be useful for creating shadows or adding dimension to a picture. Using these methods, it is possible to create many different types of images and textures.
Sgraffito
The word sgraffito means ‘scratched’ in Italian and this technique involves scratching through the surface of a paint layer to reveal a lower layer of a contrasting colour. The technique was widely used in wall decoration and ceramics but also works well in painting. Basically, you apply a base coat of paint and then scratch into the top coat with any object that will allow it to go through the painted surface. The resulting pattern, design or motif can add texture and interest to a painting.
You can use a variety of objects to make the marks, but the ‘wrong end’ of a paintbrush is particularly good. This is the end that hasn’t got the hairs on it and can be a little sharper than the usual end. You could also use a piece of card, the pointed end of a utility knife, a fingernail or even a comb. It really depends on what you want to do, but any object that will leave a mark in the paint will work.
Using this technique can be a quick way to draw a figure or a simple landscape. It can also be used to create areas of contrast or to highlight certain parts of a painting. It’s also good for representing details or precise patterns such as wrinkles in a garment, the pattern on an object or light reflecting on water. Artists often sign their paintings with sgraffito as it’s much quicker and more precise than simply painting their signature.
This technique is very effective when working with oil paint but can be adapted for acrylics. The main thing to remember is that the paint you want to show through needs to be completely dry before you scratch into it. If you don’t, the two layers will mix together and the underlying colour will be visible. Also, if you use a soft object to scratch into the surface of the paint it may become smudged or damaged.
This technique is great for creating a sense of texture in your painting as it can be made to look very rough and natural. It’s also ideal for drawing hair, allowing you to create strands of different widths to represent bunches or highlights. You can also use it to create a pattern in the background of your painting or to draw the outline of an image before filling it in.
Dabbing
Painting is a great way to add color and life to your home, but it can be a time-consuming process. Fortunately, there are many creative tricks that can help you speed up the process and get your walls looking amazing in no time.
Using dabbing as a painting technique can help you create an interesting texture in your paintings. This can be done by using a sponge, a paint roller, or even your fingers! The texture created by this technique is very unique and can be a great way to add some personality to your work.
Another easy painting trick is to use a palette knife to create a textured effect in your paintings. This can be done by dragging one color into another or using the tip of the palette knife to make small bursts of color in your paintings. This is a great technique to use if you want to create an abstract or modern style.
When you’re painting, it’s important to use the right type of paint for the job. Some surfaces, like greasy kitchen walls or areas around light switches, will not bond well with paint. A degreaser can be used to clean these types of surfaces before you start painting so that the paint adheres properly.
It’s also a good idea to protect floors, furniture, and hardware before you start painting. A drop cloth is a simple solution, but you can also use plastic bags secured with tape. This will keep any drips from damaging other surfaces and will save you the hassle of having to wash or replace your tools.
If you’re struggling with brush strokes, a simple trick is to practice on a spare canvas or piece of paper. When you’re cleaning off your brush, rub the excess paint on a blank surface and practice different brush strokes. This will help you to improve your skills and become a better painter.
Splattering
Splattering is a fun way to add a more dramatic effect to your painting. It can be used on both acrylic and watercolor paints. The key to splatter painting is to have lots of different colors ready and to use a variety of brushes. You can also experiment with changing the thickness of the splatter. For example, thinner splatters will be more delicate while thicker ones will look more dramatic.
Before you begin splattering, it is important to protect the surface beneath your canvas and the surrounding area. This is because splatter can spread quickly. It is also a good idea to wear a smock, as some paints can stain clothing. You should also wear gloves and a face mask if you are using oil-based paint. You should also have a box of rags nearby for wiping down the brushes and other tools when necessary.
To start splatter painting, load up the brush with plenty of paint and position yourself. You can choose to stand far back from the canvas if you want small, concentrated splatter marks or you can close one eye and flick the brush against the canvas, like you are using your fingernail. This will create larger splatter marks.
You can also try dipping a paintbrush in water and then slapping it on the canvas to get a splatter effect. Alternatively, you can use a plastic spoon to splatter paint. Just don’t use a spoon you plan to eat with, as even traces of paint can be toxic.
Another great splatter painting tip is to add ink to your paints to make them more vibrant. You can also create a marbled effect by combining different colors of paint together. This is a perfect technique for creating an abstract piece of art.
When you are finished, you can use this painting technique to spruce up your home or office. It’s a great way to elongate a room, making it feel bigger and more spacious. This is especially effective if you use darker tones on the ceiling and walls.
Before starting your next painting project, be sure to follow these tips and tricks to ensure success. It’s always a good idea to plan ahead and avoid painting on a windy day, as the blowing paint could mess up your work. Additionally, you should plan to do the most difficult tasks first, such as cutting in or painting trim and doors, before moving on to the easier parts of the job.