NWA Painter gives a room a fresh new look and can make a home feel brighter. It also helps protect the walls from damage and prevent mold or mildew from forming.
It’s important to prepare properly for interior painting for good results. A clean surface will give you the best chance of a satisfying paint job.
A fresh coat of interior paint brings a room back to life. It can brighten a home, create a more modern look, and make it more attractive to prospective buyers. Interior painting is a big undertaking, though, and requires proper wall preparation to ensure the best results. This seven-step guide will help you prepare your walls for a new coat of paint and get the most out of your investment.
First, clear the area. This means removing furniture from the room or at least covering it with tarps, taking down any artwork or draperies, and moving or covering light fixtures, outlets, and windows. This will minimize the chances that your belongings will be tarnished or damaged by falling or dripping paint.
You should also wash the walls before painting. This will remove dirt, grit, mold, watermarks, and dust from the surface. It will also ensure that the new coating of paint will adhere properly to the walls. After washing, you should dry the surface thoroughly.
Finally, you should patch any holes or cracks in the walls before starting to paint. This will prevent them from becoming noticeable once the paint has dried.
If you’re unsure how to do this, consult a professional. A licensed and insured painter will be able to provide advice and expertise and can complete the work efficiently and safely. They may also be able to offer you low-VOC paints, which are less likely to release harmful chemicals into the air. You should avoid using old paint in your home, as it can contain lead and other contaminants. In addition, it can be difficult to clean and remove from the surfaces.
There are entire aisles devoted to primer paints and sealers at home-improvement stores, so it’s easy to feel overwhelmed by the choices. Choosing the right one for your specific job saves time, money and frustration, and helps you achieve the results you want.
Identifying the surface type and any problem areas can help you determine the need for a specific primer. Some common situations where primer comes into play include changing from a dark shade to a lighter color or covering significant stains or damage.
Stain-blocking primers stop bleed-through of such stain-producing agents as dirt, ink, crayon marks, smoke residue, grease and mildew. You can find these in latex and oil-based formulations, with oil-based products being better at blocking water stains (see “Shellac: The Original Primer” for more details).
Bonding primers help paint adhere to surfaces that are slick or glossy, such as factory coated metal sidings, ceramic tile and glazed block walls. These are typically sanded before painting and should be washed down with a detergent or tri-sodium phosphate to remove any greasy residue.
Oil-based bonding primers are a good choice for bare wood substrates, as they penetrate the surface and help seal the porous material to prevent stains from seeping through the paint. They sand well, and are compatible with both latex and oil-based top coats. However, they release harmful volatile organic compounds (VOCs) and require mineral spirits for cleanup and drying.
VOC-free latex primers offer a low level of toxic chemicals, and they are a good fit for most home projects. However, they don’t sand as easily as oil-based products and may not cover some darker paint colors as well. Many manufacturers offer mildewcide, a compound added to the product that prevents mold and mildew from growing under the primer or the top coat.
The walls phase of interior painting may seem like a simple task, but getting the wall prepped correctly is a major component to how well the finished paint job turns out. If you skip this step, your walls may look patchy and sloppy once the paint dries.
First, sweep the walls to remove any dust or cobwebs, then vacuum baseboards and window sills and wipe them down with a damp cloth to remove any dirt and grease spots that could interfere with a smooth finish. Then, sand the surface of each wall that you plan to paint. It’s important to sand each section of the wall until it is even with the rest of the surface and smooth enough to allow the paint to bond with the wall.
Once you’ve sanded the walls, clean them again to remove any dust that may have settled and prevent your new coat of paint from adhering properly. Also, determine if you’re working with latex or oil-based paint by rubbing a small area of the wall with denatured alcohol. If the paint loses its sheen and comes off, it’s likely latex; if it sticks to the wall, you have oil-based paint.
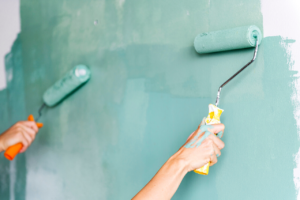
Once you have the paint and tools you need, start on the bottom of the wall, working from the inside out. Begin by dipping your roller into the paint and wiping off any excess. Then, roll the paint onto the walls using a “W” pattern, overlapping each stroke about three inches. When you get near the trim or tape line, switch to a one- or two-inch brush and cut in along the edges, around windows and doors, etc.
Painting ceilings is an important part of any room. It adds a fresh finish to the overall room design and can create a sense of height in smaller rooms. It is also an opportunity to try something new, like a bold color or pattern that might not work on the walls.
One of the most common options for paint on ceilings is white, which can make the space feel unified. However, you can get more creative with the color on your ceiling by making it darker or lighter than the walls. Darker shades can make your room look cozy and inviting, while lighter hues can make a larger room feel more open and airy.
You can also contrast the ceiling with the walls to highlight different architectural features. For example, if you have exposed wood beams on your ceiling, a bright hue can really make them pop. Similarly, tray ceilings can be painted with a light hue to make the lower part of the ceiling seem higher and more open.
When you are ready to paint the ceiling, use the same brush you used for the trim or taped edges of the wall. Begin with what is known as “cutting in,” which means to run the brush along the trim or ceiling line, leaving about 4 inches of space between the paint and the wall. This prevents any accidental bleed onto the wall.
Because the ceiling is so high, it can be difficult and time-consuming to paint. This is often best left to professional residential painting contractors. They have the tools and experience to get the job done quickly and efficiently, while minimizing disruption to your home life.
The trim phase of interior painting is when we finish the edges of the room with a crisp, clean paint line. This includes the molding around windows, doors and the baseboards. It also includes the corners and trim around built-ins.
Paint adds beauty to our living spaces, but it does a lot more than that. It keeps moisture out and prevents mildew and mold from growing on the walls. It also repels dirt and keeps our rooms bright.
Different paints are formulated for different purposes. For example, interior paint is made to be scrubbed and resists staining, while exterior paint is designed to fight fading and moisture. Interior paint also releases fewer volatile organic compounds than exterior paint. VOCs are harmful to human health and can cause breathing problems. Using low or no VOC water-based paints can reduce these risks and help to improve indoor air quality.
It is important to use the right kind of paint for your project. Using the wrong type of paint can cause it to peel or crack over time. It can also affect how light reflects off the wall and can change the color of your room. If you are unsure which paint to choose, try purchasing small swatches of paint at the hardware store and experimenting with them in your home.
When properly done, interior painting can add value to your home and make it more appealing to potential buyers. It is one of the best investments you can make for your home and is particularly important if you are thinking of selling it in the future. Freshly painted homes often sell faster and for a higher price than those that are outdated.