Landscaping – Creating a More Natural Outdoor Living Space
Landscaping Fayetteville AR is the process of enhancing outdoor areas to make them more attractive and functional. This can include everything from creating pathways to implementing hardscaping elements like patios and retaining walls.
Sustainable landscaping techniques are designed to reduce the amount of water and resources needed for landscape maintenance. This includes using drought-tolerant plants and incorporating rainwater harvesting into your design plan.
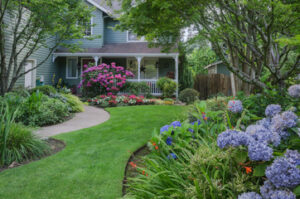
A beautifully-landscaped home with a lush lawn, blooming flowers, and attractive shrubs creates a welcoming impression on those who see it. It suggests that the property is well-maintained and cared for, which gives buyers a positive impression and can increase its value in the market.
The first step in curb appeal is basic maintenance and keeping the landscape tidy and free of debris and weeds. Regular mowing of the lawn and trimming of trees, shrubs, and other plants keeps them looking healthy. Adding mulch and ground covers to control weeds, as well as using edging to maintain clean lines around walkways and flower beds, can also enhance the look of your home.
Decorative elements like colorful flowers, rock gardens, or a prefab trellis can add charm to a yard. A unique mailbox or door color can also catch the eye and make an impression on visitors, neighbors, or potential buyers.
Trees, flowers, and shrubs not only add beauty to a yard but offer many benefits such as shade for the house, natural cooling, and privacy buffers from neighbors or traffic. Strategically placed trees and landscaping can also reduce energy costs by lowering air-conditioning demand. The sophistication of the design and size of the plants determine the level of added value to a home’s landscape.
Landscaping for curb appeal is not only a beautiful addition to your home’s exterior; it is also an investment that can pay off at the time of resale. Studies from Virginia Tech indicate that a properly-landscaped property increases its value by 5.5% to 12.7%.
A well-maintained landscape demonstrates that you are committed to your home and will take care of it. Adding mulch, edging walkways and flower beds, adding brightly colored flowers to pots and window boxes, and installing outdoor lighting can all make your home more appealing and help it sell faster. These simple steps are a great place to start for those wanting to improve their home’s appearance without spending a lot of money.
Outdoor living space
Creating an inviting outdoor living space involves a thoughtful blend of design elements. For example, a landscaper can use plant species that suit the local climate and soil type, as well as incorporate shade solutions to control sun exposure. They can also add water features that provide tranquility and promote relaxation, as well as a fire pit or fireplace to add warmth to the area. Finally, they can add furniture and other décor to enhance the visual appeal of the space.
A good landscaping company will work closely with clients to develop a plan that meets the client’s goals and budget. For instance, they will help clients establish a primary use for the space – such as entertainment or dining – which will guide their choice of materials and design elements. They will then create a design that provides that function while complementing the overall aesthetic of the home and maximizing its usability.
Landscape designs can also directly reflect the homeowner’s personality through the use of thematic garden areas. These can include fragrant herb gardens, zen-inspired meditation areas, or butterfly habitats. This approach offers a meaningful connection to nature and can be a great way to promote health and wellness.
Incorporating natural materials like wood and stone in the design of outdoor spaces adds texture and character. The use of these materials also enables the landscape to age gracefully, and helps the space merge seamlessly with the surrounding natural environment.
An experienced landscaping professional will be familiar with the various products that can enhance the usability and visual appeal of an outdoor living space, including stone surfacing, decking, and other furniture, as well as appliances and lighting. They will also be able to recommend the right plant species to suit the property’s conditions and climate, as well as provide tips on maintenance and care.
Landscapers can also use decorative items like lanterns, garden sculptures, and cozy blankets to infuse the space with a personal touch. This can be a great way to add personality and flair to a patio or deck, and is an excellent way to transform the space into a unique extension of the home. In addition, shopping local is a great way to find one-of-a-kind items that can help enhance the character of an outdoor living space.
Attracts wildlife
In a world where wildlife habitat is disappearing at an alarming rate, you can help to create a more natural environment on your own property. Landscaping with native trees, shrubs and plants can offer shelter and food for many species of birds and animals. This also helps to support the local ecosystem and conserves water resources. Whether you have a few acres of farmland or a suburban backyard, you can make your property a wildlife habitat with some simple steps.
The most important thing you can do is to provide the basic elements of wildlife habitat: food, water and shelter. Wildlife needs a variety of food sources and each species prefers specific types. You can attract many types of wild animals by planting a mix of plants that produce different foods. For example, a tree or bush that produces fruit will attract birds and squirrels while flowering plants attract bees, butterflies and other pollinators.
You should plant a variety of species and include evergreens to provide cover. Some species of wildlife prefer shaded areas, while others seek open or sunny spaces. To create a healthy and productive landscape, choose species that thrive in your climate and soil conditions. Also, minimize the use of pesticides and herbicides that can harm wildlife. Using natural controls such as beneficial insects, mowing and hand pruning can greatly reduce the amount of chemicals needed in your yard.
Creating a landscape that offers habitat can be an excellent project to do with children, making it fun and educational while contributing to the well-being of our local wildlife. It can also increase your enjoyment of your property and adds to the beauty of your home. The soothing sound of birds chirping and squirrels foraging can be quite pleasant and relaxing to the senses.
The most direct way you can improve your yard is by adding native plants to your landscaping. These species have evolved with the wildlife in your area and are more likely to attract native insects, birds and mammals. Layering vegetation, including ground covers and bushes, with taller trees provides an environment that mimics the local habitat. This can offer shelter to small mammals and birds as they nest, and it provides an abundance of foods for them throughout the year.
Increases property value
A well-designed landscape can increase property value and make a home more attractive to buyers. It can also help to reduce energy costs by shading buildings and reducing the need for air conditioning. It can also create a natural habitat for wildlife and reduce erosion by reducing runoff and improving soil quality. Landscaping can be done in many ways, including adding plants, trees, water features, walkways, and patios. It can also include decorative elements such as sculptures and lighting. Landscaping can be done by professionals or by homeowners themselves.
One of the biggest reasons that landscaping increases property value is because it gives potential buyers a great first impression of the house. A well-maintained lawn and trimmed hedges tell potential buyers that the home is cared for, which can boost a sale price by as much as 20%.
Another way that landscaping increases property value is by creating a relaxing and enjoyable environment to spend time in. This can be done by installing a fire pit for cozy nights, creating a seating area for entertaining, or adding a quiet garden nook for reading. A professionally-designed yard can also add an element of privacy by screening neighbors or preventing unwanted views.
Finally, landscaping can improve the overall appearance of a neighborhood by promoting green space and reducing urban sprawl. It can also protect against soil erosion, conserve water, and enhance air quality. In addition, it can provide a sense of community by providing a place for people to gather.
Homeowners are always looking for ways to increase the resale value of their homes, but doing a full home remodel or adding square footage isn’t always possible. Landscaping is an affordable option that can significantly increase a home’s value, attract buyers, and even offer a return on investment.
However, it’s important to remember that a yard is more than just a piece of grass or a collection of flowers. It should be a part of the total living space and reflect the lifestyle of the family who lives there. To maximize its value, it’s important to choose a balance between personal taste and broad appeal. Too many unique features may deter potential buyers and increase the time a home is on the market.
How to Tell When Your Ceiling Needs Professional Repair
Ceilings are a critical part of every home, protecting us from weather elements and providing insulation. Yet, they often face wear and tear that requires a professional approach.
From hairline cracks to structural issues, there are many reasons you might require Ceiling Repair Perth. Identifying and acting promptly can save you significant costs down the road.
When cracks appear in a ceiling, it can be a cause for concern. However, there are several factors that can determine whether a crack is serious and needs professional attention or not. Knowing the difference can save homeowners stress and money in the long run.
Generally, the shape and size of a crack is an indicator of its severity. Small cracks, like hairline and spider web cracks are often a result of building materials shifting or moving within the structure of a home. These types of cracks are usually harmless and don’t require any immediate action. However, cracks that are wide and long indicate a more serious problem and should be inspected by a professional.
These longer cracks are most likely caused by water damage. When a ceiling is exposed to moisture, it will expand and then contract once the water dries. This repeated movement can cause cracks in the ceiling over time. Cracks that extend from the ceiling to the walls are also a sign of structural damage and should be addressed immediately by a professional.
It is important to get a professional assessment of your home if you notice a crack in the ceiling. A professional can identify the source of the crack and make the necessary repairs to prevent further damage to your home or office.
Taking the correct steps in repairing a ceiling crack will help you to keep your property safe and sound for years to come. Having the right knowledge of what types of cracks are safe to ignore and which require immediate attention can prevent more expensive problems from developing down the road.
When repairing a crack, it is best to start by laying down a tarp or piece of plastic in the area where you will be working to catch any debris that may fall. Once you have placed the tarp or plastic, set up a ladder so that you can work safely. Ensure that the ladder is stable and that it can support your weight before using it to work on the ceiling. When you are ready to begin, spread a thin coat of joint compound over the entire cracked surface, being sure to cover the tape and screw heads. Ensure that the last coat is slightly lighter in color as this will help to conceal the repair.
Water Stains
Water stains aren’t just unsightly; they can also indicate a serious problem that needs to be addressed. If ignored, the spot may bleed out into other areas of the home, contributing to mold growth and a host of other issues that can lead to health problems for you and your family.
One of the most common reasons for water stains is a leaky roof. Perhaps a recent storm has caused some shingles to come loose, or an old chimney has cracked and is letting rainwater seep into the attic. Whatever the reason, a leaky roof is a serious problem that should be addressed immediately.
Leaking pipes can also be the cause of water stains. If you suspect this is the case, check to see if the stain is in close proximity to a sink, toilet or other plumbing fixture. If it is, then you should shut off the water to that area of your home and call a plumber.
If the stains are isolated to one area of your ceiling, they’re likely caused by condensation. This can be a result of poor insulation, insufficient attic ventilation, or even just high humidity levels in the home. In this case, it’s important to improve your home’s ventilation and humidity levels to prevent moisture infiltration and stop the stains from appearing.
If a water stain is caused by a leaky roof, or by a faulty pipe, it’s crucial to locate and repair the source of the problem. Covering the water stains with paint, even with a stain-blocking primer, will not fix the problem if it isn’t resolved.
Wood Rot
Wood rot is an unsightly and dangerous problem that can lead to structural failure in your home. This decaying fungus destroys cellulose, which makes wood weak and brittle. Wood rot can take hold in many places, from support posts and beams to floor and ceiling joists. It can also lead to problems with your doors and windows, as the weakened wood can no longer support them.
If you find rot in your home, it’s important to act quickly to prevent the situation from worsening. A professional can help you repair and replace any rotting timber, and they can also advise on the best way to keep it from occurring again in the future.
In nature, wood rot is an essential part of the decomposition process. However, it’s something that sends homeowners into panic when they discover it in their homes. This is because the damage can be quite severe, leading to weakened supports, destroyed flooring and ceilings, and even collapsed roof decking. The cost to repair and replace the affected materials can run into the tens of thousands of dollars.
While rot can be hard to spot, there are some telltale signs that can give it away. Wet rot has a dark appearance and a distinct smell. It’s also soft to the touch, and if you press on it, it will sink in easily. It can be caused by a number of factors, including roof damage, leaky gutters or leaking pipes.
Dry rot is much harder to identify, but the signs are still there. The surface of the wood will have a distinctive, powdery texture and there will be deep cracking in the affected areas. This fungus is more serious than wet rot, as it can cause significant structural damage.
Both wet and dry rot require damp conditions to thrive, so the first step in preventing it is to ensure that your house is well ventilated and that any water leaks are fixed as soon as possible. The second step is to treat any affected areas with a fungicide. This can be done by removing any damaged timber, scrubbing it with a wire brush, and applying a fungicide to all surfaces within five feet of the affected area.
Poor Installation
The quality of the materials used to construct a home’s ceiling is vital to its durability and structural integrity. If poor installation techniques are employed, it can lead to a variety of issues, including cracks, water damage, and plaster damage. Regular home maintenance tasks such as painting and surface inspections can identify potential problems before they escalate, allowing for timely intervention.
Ceiling materials vary, from drywall to plaster and other traditional options, each with unique challenges and repair methods. It’s important to evaluate each issue thoroughly, as certain cracks and discoloration may indicate underlying issues that require more extensive or complex repairs.
A common issue is sagging, which occurs when the ceiling material begins to separate from its supporting structure. Depending on the cause, this can be dangerous and require immediate attention. In some cases, the ceiling may collapse if left untreated. This issue can be caused by shifting foundations, seismic activity, termite infestation, and water damage. To resolve this problem, homeowners should consult with a professional to identify the root cause and implement appropriate solutions.
Leaking ceilings are a significant source of water damage, and they often result in unsightly water stains on the surface. This is usually due to faulty plumbing or roof damage, and it’s important to identify and address the underlying cause in order to avoid further water damage and costly structural repairs down the road.
Plaster damage is a common homeowner concern, manifesting as crumbling or peeling plaster, usually due to moisture infiltration or the material’s natural aging process. To prevent this, homeowners can employ spackling and joint compound for minor repairs, while more substantial issues should be addressed by professionals using modern drywall solutions.
Changes in ceiling texture are another frequent problem, which can be caused by a number of factors. To fix this, homeowners should first use a utility knife to remove any free drywall tape, then install new tape and carefully apply 2-3 coats of joint compound, each of which must be sanded down before being painted.
Performing home repair projects involving the ceiling requires a high level of skill and experience, particularly when dealing with issues such as wood rot or structural damage. These types of issues can pose major safety risks, and they should always be addressed by a professional to ensure that the work is performed correctly.
Landscaping: The Essential Guide
Landscaping adds beauty to outdoor spaces while addressing functional, environmental and horticultural needs. Effective landscaping requires a careful site inventory and analysis.
The basic principles of landscape design include simplicity, repetition, line, variety, and harmony. To create a cohesive composition, lines direct the eye to focal points such as water features and flower gardens. Contact Prime Cut Lawn and Landscaping for professional help.
Plants are the “soft” component of a landscape, offering beauty and texture to outdoor spaces. They also provide a variety of practical benefits, such as shade and soil stabilization. In addition, well-chosen plants can enhance the color scheme of hardscape features and create a sense of harmony within a landscape.
Landscaping is a great way to increase your home or business’s value and curb appeal, as well as create a pleasant environment to spend time in. In fact, many real estate agents agree that a well-kept landscape can add as much as 20% to your property’s value!
The design process starts with selecting the appropriate flora for your property, taking into consideration both environmental and aesthetic factors. Choosing native plants is an important part of this step. Unlike foreign plants, native species have evolved in the region where they are planted and co-evolved with local wildlife. In contrast, exotic plants often become invasive pests, out-competing native plants and degrading habitat in natural areas.
Native plants are attractive, relatively easy for the homeowner to acquire and maintain, and offer many ecological benefits. They also promote biodiversity in surrounding ecosystems. Finally, a landscape composed of native plants is a more sustainable option because it limits the use of water and fertilizer.
Incorporating native plants into your landscape is also a great way to decrease air pollution and climate change. By absorbing carbon dioxide and releasing oxygen, plants help to reduce air pollution and greenhouse gases. Additionally, native plants are drought-tolerant and require less watering than non-native species.
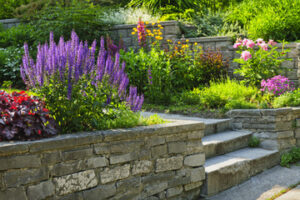
Hardscaping
Hardscapes are non-living components of landscaping that include paved areas, pathways, patios, decks, walls, and more. They’re typically made from materials like brick, stone, concrete and wood and can be incorporated into your landscape design in a number of ways. They can serve a practical purpose, such as preventing erosion or guiding foot traffic and limiting the impact on grassy areas and plants. They can also enhance the aesthetic of your space, such as through the use of water features such as fountains or ponds that can offer a tranquil atmosphere and become a focal point.
The best hardscapes are ones that integrate both a function and an aesthetic element. For example, walkways serve a practical purpose but can be stylized to fit the overall landscape design and create unique textures that contrast with the plant material. A gazebo or pergola is another example of a hardscape that provides a focal point in the garden, while simultaneously limiting the lawn square footage to reduce the time you spend mowing and maintaining your outdoor space.
Ultimately, commercial hardscapes are meant to protect the organic parts of your landscape and add a sense of structure and organization. For example, retaining walls prevent erosion and help manage slopes, pavers provide easier access through the landscape and drainage solutions ensure that water doesn’t pool or seep into your foundation. This is all while adding a touch of beauty and increasing the value of your property. This is why it’s important to work with a professional to create the right hardscape for your commercial property.
Lighting
Landscape lighting accentuates the beauty of your home and yard. Strategically placed lights add drama, define spaces and draw attention to features like fountains, ponds and flower gardens. It also improves visibility for guests on pathways, walkways and driveways reducing the risk of tripping and falling.
Illuminating steps and paths helps prevent accidents and ensures that guests can enjoy the outdoors safely well into the night. It’s also a great way to highlight unique stone or other landscaping elements, as well as make your home and yard look warmer and inviting. Lighting can even be used to amplify the effect of a water feature or other design element, and is particularly effective for accenting statues and trees.
Lighting is important in a garden because it can affect the color of a plant. Different colors evoke different emotions, so it’s crucial to use them strategically. For example, warm colors like red and orange evoke excitement and create a sense of energy, while cool colors such as blue and green provide a relaxing feeling.
While lighting isn’t usually considered a main component of landscaping, it is still an important part of any garden. Up-lighting or spotlighting is a popular way to add a dramatic effect to any space. It can also be used to emphasize the shape of a tree or object by silhouetting it. Additionally, a properly-installed light can reduce the amount of water a plant loses through transpiration, which can help keep it healthy and lush. This can be especially useful for tropical plants that may need extra protection from cold temperatures or other factors. In addition to enhancing the overall look of your home and yard, lighting can also increase your property value. It shows potential buyers that you take pride in your property and are committed to keeping it looking its best at all times.
Water
Keeping the landscape’s water cycle in good working order is essential. Landscaping that maintains a healthy water cycle can help reduce flooding, provide natural rainwater harvesting and increase groundwater recharge, and support biodiversity and human well-being.
To create a water-efficient landscape, begin by identifying the different microclimates in your yard. Moisture, sunlight and wind can influence the amount of water a landscape needs. Group plants with similar water requirements together, and then use your irrigation schedule to avoid over or under-watering them.
Consider using native plants that are adapted to the local environment. These plants will be better suited to the soil, climate and pests of your area and will require less maintenance and watering than non-native plants. Xeriscapes are landscapes that can be designed to minimize water use by using low water-use plants, mulches that retain moisture and reduce weeds, and irrigation methods that conserve water and time.
Water features, such as fountains and ponds, are also a great way to add beauty and interest to your yard. Many types of water features are available, from simple wall fountains to large cascading waterfalls. If you’re looking for a low-maintenance option, pondless waterfalls are a popular choice. These water features recirculate the water, so they don’t require much maintenance and are safe for children and pets.
Trees are an important part of any landscape, and they can do a lot to improve the health of your outdoor space. In addition to providing shade, they can also help keep the air clean by absorbing nitrogen oxides, which contribute to smog, and carbon dioxide, which causes the greenhouse effect. In addition, trees are great for reducing erosion and controlling stormwater runoff.
Maintenance
Regular maintenance of the landscape helps ensure that plants remain healthy and attractive. This includes watering, weed control, and pruning. It may also include mulching, aeration, or fertilization to promote root growth and enhance overall plant health.
Maintaining a well-groomed yard improves the aesthetic appeal of your home or business, and it can also increase its value. Studies have shown that homes with well-maintained lawns and gardens sell for more money than those that don’t. In addition, regularly mowed grass and properly pruned shrubs are safer for children and pets to play in than overgrown ones.
Maintenance practices can be adjusted to meet the needs of your garden on a seasonal basis. This allows for the most cost-effective use of resources, such as materials and labor. It can also help reduce the need for costly repairs or replacements. Sustainable landscape maintenance is a long-term approach to maintaining the health, beauty and sustainability of your garden.
In addition to keeping your lawn looking its best, maintenance helps to improve the quality of your soil and water. Proper mowing, trimming and irrigation techniques prevent overgrowth, which can lead to soil erosion and water runoff. It also allows for the removal of debris, such as leaves and branches, preventing them from clogging storm drains.
Ongoing maintenance also provides early detection of potential pest infestations and weed problems, which can be addressed promptly to avoid widespread damage or expensive treatments. Regular inspections and care can also boost the strength of tree roots, which helps them hold soil in place to control erosion and protect against wind damage. They can even help reduce noise pollution by acting as a natural filter that absorbs and releases carbon dioxide and oxygen.
7 Steps to Preparing Your Walls for Interior Painting
NWA Painter gives a room a fresh new look and can make a home feel brighter. It also helps protect the walls from damage and prevent mold or mildew from forming.
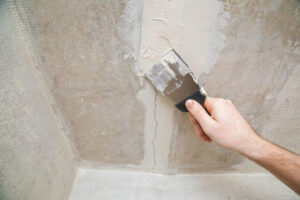
It’s important to prepare properly for interior painting for good results. A clean surface will give you the best chance of a satisfying paint job.

A fresh coat of interior paint brings a room back to life. It can brighten a home, create a more modern look, and make it more attractive to prospective buyers. Interior painting is a big undertaking, though, and requires proper wall preparation to ensure the best results. This seven-step guide will help you prepare your walls for a new coat of paint and get the most out of your investment.
First, clear the area. This means removing furniture from the room or at least covering it with tarps, taking down any artwork or draperies, and moving or covering light fixtures, outlets, and windows. This will minimize the chances that your belongings will be tarnished or damaged by falling or dripping paint.
You should also wash the walls before painting. This will remove dirt, grit, mold, watermarks, and dust from the surface. It will also ensure that the new coating of paint will adhere properly to the walls. After washing, you should dry the surface thoroughly.
Finally, you should patch any holes or cracks in the walls before starting to paint. This will prevent them from becoming noticeable once the paint has dried.
If you’re unsure how to do this, consult a professional. A licensed and insured painter will be able to provide advice and expertise and can complete the work efficiently and safely. They may also be able to offer you low-VOC paints, which are less likely to release harmful chemicals into the air. You should avoid using old paint in your home, as it can contain lead and other contaminants. In addition, it can be difficult to clean and remove from the surfaces.
There are entire aisles devoted to primer paints and sealers at home-improvement stores, so it’s easy to feel overwhelmed by the choices. Choosing the right one for your specific job saves time, money and frustration, and helps you achieve the results you want.
Identifying the surface type and any problem areas can help you determine the need for a specific primer. Some common situations where primer comes into play include changing from a dark shade to a lighter color or covering significant stains or damage.
Stain-blocking primers stop bleed-through of such stain-producing agents as dirt, ink, crayon marks, smoke residue, grease and mildew. You can find these in latex and oil-based formulations, with oil-based products being better at blocking water stains (see “Shellac: The Original Primer” for more details).
Bonding primers help paint adhere to surfaces that are slick or glossy, such as factory coated metal sidings, ceramic tile and glazed block walls. These are typically sanded before painting and should be washed down with a detergent or tri-sodium phosphate to remove any greasy residue.
Oil-based bonding primers are a good choice for bare wood substrates, as they penetrate the surface and help seal the porous material to prevent stains from seeping through the paint. They sand well, and are compatible with both latex and oil-based top coats. However, they release harmful volatile organic compounds (VOCs) and require mineral spirits for cleanup and drying.
VOC-free latex primers offer a low level of toxic chemicals, and they are a good fit for most home projects. However, they don’t sand as easily as oil-based products and may not cover some darker paint colors as well. Many manufacturers offer mildewcide, a compound added to the product that prevents mold and mildew from growing under the primer or the top coat.
The walls phase of interior painting may seem like a simple task, but getting the wall prepped correctly is a major component to how well the finished paint job turns out. If you skip this step, your walls may look patchy and sloppy once the paint dries.
First, sweep the walls to remove any dust or cobwebs, then vacuum baseboards and window sills and wipe them down with a damp cloth to remove any dirt and grease spots that could interfere with a smooth finish. Then, sand the surface of each wall that you plan to paint. It’s important to sand each section of the wall until it is even with the rest of the surface and smooth enough to allow the paint to bond with the wall.
Once you’ve sanded the walls, clean them again to remove any dust that may have settled and prevent your new coat of paint from adhering properly. Also, determine if you’re working with latex or oil-based paint by rubbing a small area of the wall with denatured alcohol. If the paint loses its sheen and comes off, it’s likely latex; if it sticks to the wall, you have oil-based paint.
Once you have the paint and tools you need, start on the bottom of the wall, working from the inside out. Begin by dipping your roller into the paint and wiping off any excess. Then, roll the paint onto the walls using a “W” pattern, overlapping each stroke about three inches. When you get near the trim or tape line, switch to a one- or two-inch brush and cut in along the edges, around windows and doors, etc.
Painting ceilings is an important part of any room. It adds a fresh finish to the overall room design and can create a sense of height in smaller rooms. It is also an opportunity to try something new, like a bold color or pattern that might not work on the walls.
One of the most common options for paint on ceilings is white, which can make the space feel unified. However, you can get more creative with the color on your ceiling by making it darker or lighter than the walls. Darker shades can make your room look cozy and inviting, while lighter hues can make a larger room feel more open and airy.
You can also contrast the ceiling with the walls to highlight different architectural features. For example, if you have exposed wood beams on your ceiling, a bright hue can really make them pop. Similarly, tray ceilings can be painted with a light hue to make the lower part of the ceiling seem higher and more open.
When you are ready to paint the ceiling, use the same brush you used for the trim or taped edges of the wall. Begin with what is known as “cutting in,” which means to run the brush along the trim or ceiling line, leaving about 4 inches of space between the paint and the wall. This prevents any accidental bleed onto the wall.
Because the ceiling is so high, it can be difficult and time-consuming to paint. This is often best left to professional residential painting contractors. They have the tools and experience to get the job done quickly and efficiently, while minimizing disruption to your home life.
The trim phase of interior painting is when we finish the edges of the room with a crisp, clean paint line. This includes the molding around windows, doors and the baseboards. It also includes the corners and trim around built-ins.
Paint adds beauty to our living spaces, but it does a lot more than that. It keeps moisture out and prevents mildew and mold from growing on the walls. It also repels dirt and keeps our rooms bright.
Different paints are formulated for different purposes. For example, interior paint is made to be scrubbed and resists staining, while exterior paint is designed to fight fading and moisture. Interior paint also releases fewer volatile organic compounds than exterior paint. VOCs are harmful to human health and can cause breathing problems. Using low or no VOC water-based paints can reduce these risks and help to improve indoor air quality.
It is important to use the right kind of paint for your project. Using the wrong type of paint can cause it to peel or crack over time. It can also affect how light reflects off the wall and can change the color of your room. If you are unsure which paint to choose, try purchasing small swatches of paint at the hardware store and experimenting with them in your home.
When properly done, interior painting can add value to your home and make it more appealing to potential buyers. It is one of the best investments you can make for your home and is particularly important if you are thinking of selling it in the future. Freshly painted homes often sell faster and for a higher price than those that are outdated.